If you are craving an indulgent treat that feels both luxurious and comforting, this Chocolate Molten Lava Cake Recipe is exactly what you need. It delivers an irresistible, rich chocolate cake with a luscious, gooey molten center that oozes with every single forkful. Perfect for impressing guests or creating a special moment at home, this recipe combines simple ingredients in a quick yet impressive baking process that anyone can master. Whether it’s a romantic evening or a spontaneous dessert craving, this Chocolate Molten Lava Cake Recipe will become your new favorite go-to for decadent chocolate bliss.
Ingredients You’ll Need

Every ingredient in this recipe plays a crucial role in achieving that perfect balance of texture, flavor, and gooey melt-in-your-mouth magic. You’ll appreciate how straightforward and accessible these pantry staples are, transforming effortlessly into a show-stopping dessert.
- Semi-sweet chocolate (4 oz / 115 g): This provides the rich, deep chocolate flavor that melts perfectly.
- Unsalted butter (½ cup / 115 g): Adds creaminess and helps create that soft, tender cake texture.
- Large eggs (2): Bind the ingredients and contribute to the cake’s structure and moisture.
- Large egg yolks (2): Enhance richness and help achieve that luxurious molten center.
- Granulated sugar (¼ cup / 50 g): Sweetens the cake without overpowering the chocolate.
- All-purpose flour (2 tbsp): Just enough to hold the cake together without making it dense.
- Butter and cocoa powder for ramekins: Ensures your cakes release easily and adds a subtle chocolatey edge.
How to Make Chocolate Molten Lava Cake Recipe
Step 1: Prepare Your Ramekins
Begin by preheating your oven to 425°F (220°C). Grease four ramekins with butter to prevent sticking, then lightly dust the insides with cocoa powder for that extra touch of chocolate flavor and to help release the cakes effortlessly after baking.
Step 2: Melt the Chocolate and Butter
Next, melt the semi-sweet chocolate and butter together. You can do this gently over a double boiler or in short bursts in the microwave, stirring frequently to keep the mixture smooth without seizing. This luscious blend forms the base of your molten lava cake’s intense chocolate flavor and velvety texture.
Step 3: Whisk Eggs, Yolks, and Sugar
In a separate bowl, whisk the eggs, egg yolks, and sugar until the mixture becomes light and thick. This aeration is crucial for creating a tender crumb and helps contrast beautifully with the dense molten center.
Step 4: Combine and Fold in Flour
Pour the warm chocolate mixture into the egg mixture and stir gently to combine. Then fold in the flour carefully, just enough to incorporate, so your cakes stay light and delicate while still holding their shape.
Step 5: Bake to Perfection
Divide the batter evenly into your prepared ramekins and pop them in the oven. Bake for about 12 to 14 minutes until the edges are set but the centers still look soft and slightly jiggly. This is the magic moment to ensure that signature molten lava core.
Step 6: Invert and Serve Immediately
Allow the cakes to cool for about a minute, then gently run a knife around the edges and invert each ramekin onto a plate. The molten center will ooze out beautifully, making a stunning presentation and a mouthwatering first bite.
How to Serve Chocolate Molten Lava Cake Recipe

Garnishes
Adding a dusting of powdered sugar or a handful of fresh raspberries on top creates an elegant look and a burst of freshness. A scoop of vanilla ice cream or a dollop of whipped cream also pairs perfectly, balancing the warmth of the molten cake with a cool, creamy contrast.
Side Dishes
Serving this cake alongside lightly sautéed fresh berries or a drizzle of raspberry coulis adds bright, tart notes that complement the richness of the chocolate. For a more indulgent experience, a spoonful of mascarpone cheese or crème fraîche can also be delightful.
Creative Ways to Present
Try serving your Chocolate Molten Lava Cake Recipe in elegant glass ramekins for a sophisticated single-serve presentation or garnish with edible flowers for a romantic dinner touch. For a fun twist, sprinkle crushed nuts on top or serve with a shot of espresso to amp up the flavor experience.
Make Ahead and Storage
Storing Leftovers
Molten lava cakes are best enjoyed fresh, but if you have leftovers, store them in an airtight container in the refrigerator for up to 2 days. Keep in mind the molten center may firm up when chilled, so slightly reheating before serving is recommended.
Freezing
You can freeze the unbaked batter in the prepared ramekins for up to 1 month. Wrap them tightly with plastic wrap and then aluminum foil. When ready to bake, just thaw overnight in the refrigerator and bake as usual.
Reheating
To revive the molten center after chilling or freezing, warm your cakes in the microwave for about 20 seconds or in a preheated 350°F (175°C) oven for 5 minutes. This brings back the gooey lava effect that makes this dessert so dreamy.
FAQs
Can I use milk chocolate instead of semi-sweet chocolate?
Absolutely! Using milk chocolate will make the cake sweeter and creamier, but you might lose some of the deep, intense chocolate flavor that semi-sweet provides. Adjust the sugar accordingly if you prefer a less sweet dessert.
How do I know when the cakes are perfectly baked?
The edges should look firm and fully set, while the center remains soft and slightly jiggly to the touch. If the center looks dry or fully firm, the molten effect may be lost.
Can I make this recipe vegan or dairy-free?
This traditional recipe relies on eggs and butter, but you can experiment with vegan substitutes like flax eggs and dairy-free butter. Keep in mind, the texture and melting qualities might vary.
Is it necessary to dust the ramekins with cocoa powder?
Dusting with cocoa powder prevents sticking while adding a subtle chocolate layer to the crust. If you don’t have cocoa powder, you can use flour, but the flavor will be milder.
How soon should I serve after baking?
Serve immediately after baking and inverting. The molten lava effect is at its peak fresh from the oven, making it the most delicious and decadent experience.
Final Thoughts
There’s something truly magical about this Chocolate Molten Lava Cake Recipe that turns a few simple ingredients into an unforgettable dessert. Whether you’re surprising someone special or indulging your own sweet tooth, it’s a warm hug of chocolatey goodness every time. I can’t wait for you to try it and see just how easy it is to create that perfect molten center at home—trust me, one bite and you’ll be hooked.
Print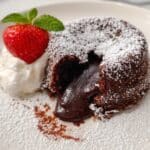
Chocolate Molten Lava Cake Recipe
- Total Time: 24 min
- Yield: 4 cakes
- Diet: Vegetarian
Description
A rich, decadent chocolate cake with a gooey molten center — the ultimate romantic or restaurant-style dessert you can make at home in under 30 minutes. This classic chocolate molten lava cake combines smooth melted chocolate with a light, fluffy cake exterior, perfect for impressing guests or treating yourself to a luxurious dessert.
Ingredients
Chocolate Mixture
- 4 oz (115 g) semi-sweet chocolate
- ½ cup (115 g) unsalted butter
Cake Batter
- 2 large eggs
- 2 large egg yolks
- ¼ cup (50 g) granulated sugar
- 2 tbsp all-purpose flour
For Preparation
- Butter and cocoa powder for greasing ramekins
Instructions
- Prepare Ramekins: Preheat your oven to 425°F (220°C). Generously grease four ramekins with butter and dust them lightly with cocoa powder to prevent sticking and add a subtle chocolate hint.
- Melt Chocolate and Butter: Melt the semi-sweet chocolate and unsalted butter together using a double boiler or microwave in short bursts, stirring until the mixture is smooth and fully combined.
- Whisk Eggs and Sugar: In a separate bowl, whisk together the eggs, egg yolks, and granulated sugar until the mixture becomes light in color and thick in texture, which ensures a fluffy cake.
- Combine Mixtures: Slowly stir the melted chocolate and butter mixture into the whisked eggs and sugar, then gently fold in the all-purpose flour without overmixing to maintain the cake’s delicate texture.
- Fill Ramekins and Bake: Divide the batter evenly among the prepared ramekins. Bake in the preheated oven for 12 to 14 minutes, or until the cake edges are set but the centers remain soft and slightly jiggly, ensuring the molten lava center.
- Serve Immediately: Remove from the oven and allow the cakes to cool for 1 minute. Carefully invert each ramekin onto a plate to release the cake, serving immediately to enjoy the warm, gooey molten center.
Notes
- Serve with vanilla ice cream or whipped cream to complement the rich chocolate flavor.
- Do not overbake, or the molten center will solidify and lose its gooey texture.
- Prep Time: 10 min
- Cook Time: 14 min
- Category: Dessert
- Method: Baking
- Cuisine: American

